 Skip to content

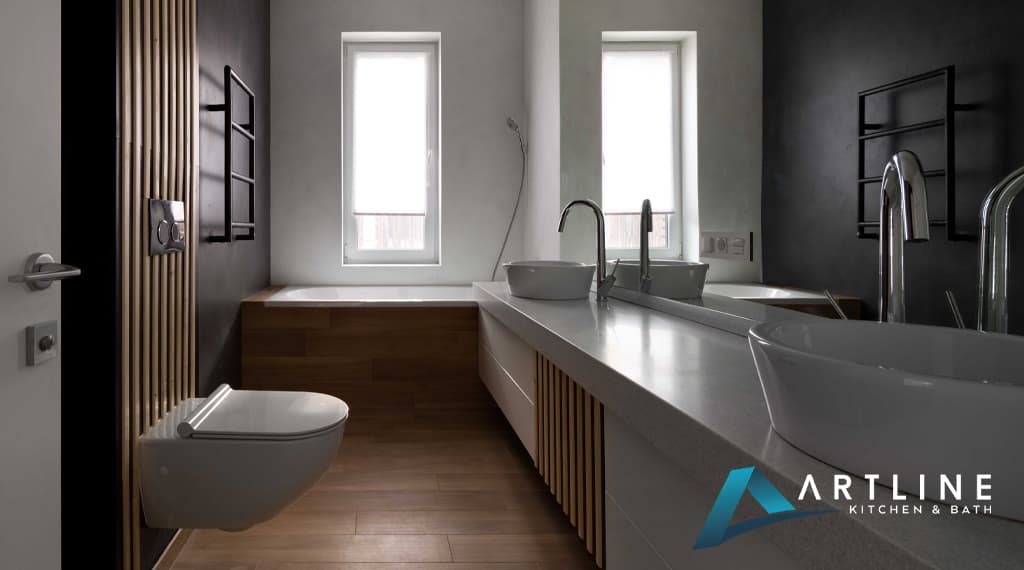
Bathroom remodeling steps are key to transforming your space to reflect your taste and meet your needs. The bathroom is where we begin and end our days, and it should be a comfortable space for rejuvenation. Many homeowners are unhappy with their standard bathrooms and seek to transform their houses into true homes by taking ownership of their interior design. Through careful planning and with the right partner, you can have a hassle-free remodeling journey and bring your vision to life.
Consider these 8 steps in a bathroom remodeling project:
The planning stage is the most important, as you need to set your goals and priorities straight. Finalizing a vision can be challenging, especially with so many choices available. Spend time reflecting on your needs and desires to ensure you invest in something you truly want.
Once the vision is finalized, budgeting and choosing a bathroom remodel contractor will be easier since both are dictated by the size and type of remodel you are seeking. Your contractor will acquire the necessary permits and create a design to solidify your dream bathroom. You will have the opportunity to work with interior designers to pick out materials and layouts that fit your aesthetic.
After the planning and design stages, the hands-on work begins with demolition and construction. This stage might include plumbing work, electrical rewiring, and more. While it might sound daunting, taking the right safety precautions and planning can make it a smooth process. Once your new fixtures are installed and final inspections are completed, you will be greeted with your new bathroom!
These 8 steps to bathroom remodeling ensure a successful transformation of your space, turning your bathroom into a personalized, rejuvenating sanctuary
1. Planning
Planning is the cornerstone of any successful bathroom remodeling project, as it sets the stage for a smooth and efficient process that is true to your heart’s desire. There are 5 pillars to any successful remodel planning: setting goals and priorities early on, determining a realistic budget and timeline, choosing the right contractor, and finding out about the necessary permits and relevant regulations surrounding your project.
Setting clear goals and priorities ensures your vision is sharply defined in your head and aligns with your needs and desires. Determining your budget early on helps you make informed decisions and avoid unexpected expenses. Establishing a realistic timeline keeps the project on track and minimizes disruptions and nuisances. Choosing a reliable remodeling contractor is crucial for quality workmanship and professional guidance. Understanding permits, and regulations ensure your project complies with local building codes, preventing costly delays and legal issues.
Set Goals and Priorities
Set your goals and arrange them in descending order of priority to solidify your dreams. Your mind will be buzzing with ideas before the actual planning, but without setting tangible, actionable goals and deciding on your priorities, all that buzz will mean nothing.
Clearly define what you want to achieve with the remodeling. Your goals could be:
- To increase functionality
- Make your space more ADA-compliant
- Increase the resale value of your property
- Improve the aesthetics of your space
- To increase storage space
Each goal entails different purchases and design features, and having a clear idea of your goals and their importance will streamline the remodeling journey significantly.
Determine Your Budget
Decide on your budget for the remodeling journey in advance. Make sure the budget you have in mind does not fit the actual project. You should have some breathing room to take care of unexpected expenses that might occur during the remodel. Plumbing adjustments, changes in the design plan, material changes, and more could present extra expenses. While your contractor should be transparent with you about the pricing, you should still be prepared for such occurrences.
Timeline
Set a realistic timeline for the remodeling process. There will be inevitable nuisances around the project area, such as construction noise and dust, and depending on the scope of work, the project could take weeks or months. Allocating specific amounts of time to each stage ensures that the project is done in a timely fashion with minimum disruptions to your daily routine.
Choose a Remodeling Contractor
Choosing the right remodeling contractor is crucial for the success of your project. A skilled contractor provides expert guidance and quality workmanship and ensures your project stays within budget and on schedule. There are a lot of contractors on the market who are fighting for your attention. Discern their reliability by examining them based on these 6 qualities:
- Experience and Expertise: An experienced contractor is better equipped to undertake whatever project you might have in mind for your bathroom. The brands they partner with, the number of projects they previously completed, and the breadth of their portfolio can be strong evidence of their experience and expertise.
- Reputation: Positive reviews and recommendations from past clients are invaluable. Check Google reviews, social media comments, and similar to see what people are saying about the contractor.
- Licensing and Insurance: Proper credentials and insurance coverage protect your investment and ensure it is in good hands. Inquire about their credentials and certifications before you strike a deal.
- Communication Skills: Clear, prompt, and professional communication is the key to a smooth, hassle-free remodeling journey. Remodeling projects can be long and tiring. Having a communicative partner will halve your stress.
- Portfolio of Work: A large and varied portfolio demonstrates the quality and style of the contractor through previous projects. Gather some inspiration from their portfolio for your bathroom.
- Warranty: A good warranty or guarantee on their workmanship proves that the contractor stands behind their work. Inquire about their warranty policies to see how much they trust their work and how helpful they are towards clients.
Permits and Regulations
Understanding permits and regulations is essential to ensure your bathroom reconstruction project complies with local building codes and does not incur legal repercussions. The contractor should acquire permits since they are the experts. Check with your local authorities to determine the necessary permits and inspections required for your project and cross-check the list offered by your contractor. Compliance with such regulations prevents legal issues and fines and ensures the safety and durability of your remodeled bathroom.
2. Design
The design phase of a bathroom remodeling project is where your vision begins to take shape. You will partner with designers and technicians to pick a layout, select materials, and create a holistic design plan to guide the demolition and construction.
Choose a Layout
Selecting the right layout is essential for maximizing space and functionality in your bathroom. Consider the placement of fixtures, storage solutions, and the overall flow of the room. A well-thought-out layout ensures that the bathroom is both aesthetically pleasing and practical for daily use.
Commonly used bathroom layouts to improve the efficiency and beauty of bathroom spaces: Jack and Jill, I-shaped, half, full, split, wet room, three-quarter, U-shaped, en suite, and galleystyle. You can directly apply one of them, mix and match different layout options, or divert from the beaten path entirely and come up with a unique solution. However, your decision will ultimately be defined by the amount of space you have and your specific needs.
- Jack and Jill Bathroom Layout: A Jack and Jill bathroom features two separate entry points and often includes two sinks or vanities for multiple users. It’s ideal for families.
- L-shaped Bathroom Layout: An L-shaped bathroom provides natural privacy by sectioning different task areas. The shape allows for separating the shower or toilet area from the vanity with a screen or door, enhancing functionality.
- Half Bathroom Layout: Half bathrooms, typically 3 to 4 feet wide and 6 to 8 feet long, feature a toilet and sink but no bath or shower.
- Full Bathroom Layout: A full bathroom includes a sink, toilet, tub, and shower stall, offering complete convenience.
- Split Bathroom Layout: Split bathrooms separate the sink area from the toilet or shower with a lockable door, allowing simultaneous use of different areas.
- Wet Room Layout: A wet room is a waterproof bathroom with an open shower area, creating an accessible and low-maintenance space.
- Three-Quarter Bathroom Layout: A three-quarter bathroom includes a toilet, sink, and shower but no bathtub.
- U-shaped Bathroom Layout: A U-shaped bathroom maximizes space by arranging fixtures along the walls, creating an open central area.
- En-Suite Bathroom Layout: An en-suite bathroom is attached to a bedroom, providing privacy for the occupant.
- Galley-Style Bathroom Layout: A galley-style bathroom is designed for narrow, long spaces, with fixtures placed side-by-side on one wall or parallel walls.
Select Materials
Choosing high-quality materials is crucial for the longevity and appearance of your bathroom. Look into durable options for flooring, countertops, and fixtures that fit your budget and style. Opt for materials that are moisture-resistant and easy to maintain to keep your bathroom looking fresh for years to come.
Incorporate New Trends
During the design stage, ask your contractor about current trends or browse interior design blogs to collect inspiration. Incorporating new trends into your bathroom remodel increases its resale price significantly. This is especially a great idea if you plan on selling the house soon. While trends change, here are four safe bets you can use or draw inspiration from:
- Smart Technology: You can integrate smart showers, mirrors, and toilets that can be controlled via apps for a modern, tech-savvy bathroom experience. Such bathrooms are especially popular in urban settings.
- Natural Materials: Natural stone, wood, and bamboo create a warm, organic feel that brings a touch of nature indoors. Natural materials are always in style regardless of the trend they are associated with at the time. They are used for rustic, Scandinavian, and similar nature-inspired aesthetics.
- Minimalist Design: Clean lines, simple fixtures, and a neutral color palette achieve a sleek, clutter-free look. Thanks to their simplicity, no-fuss designs will always be in demand.
- Bold Tile Patterns: Incorporating striking tile designs, such as geometric patterns or colorful mosaics, adds personality and visual interest to bathroom spaces. This trend could be just what you need to create an inviting space that reflects your aesthetic preferences.
Create a Design Plan
A detailed design plan serves as a blueprint for your remodeling project. This plan should include the layout, materials, color schemes, and any special features you want to incorporate. Having a comprehensive design plan helps streamline the remodeling process and ensures that all elements work harmoniously together. Certain contractors offer 3D models of the design prior to demolition and renovation to flesh out your vision truly.
3. Demolition and Removal
The demolition and removal phase involves safely dismantling and removing old fixtures, tiles, and other materials to create a clean slate for the remodel. By following proper safety precautions and disposal methods, you can ensure a smooth and efficient demolition process. This preparation sets the foundation for the successful installation of new elements in your redesigned bathroom.
Take Necessary Safety Precautions
Take safety precautions to protect yourself and the crew from accidents and health hazards. Here are 4 common precautions you should take:
- PPE for the Crew: The crew in charge of removal should be equipped with protective gear, such as gloves, goggles, and masks, to minimize the risk of accidents.
- Ventilation: Ensure the area is well-ventilated for the workers since demolition will create a lot of dust, which could prove hazardous.
- Turn off All Utilities: You should turn off all utilities, including water and electricity, before starting any demolition work to prevent electrocution and similar hazards.
- Enclosure: Enclose the demolition area with a protective curtain to prevent dust and slip hazards from spilling into other spaces. Also, make sure the area is inaccessible to children and pets.
Remove Old Fixtures
Carefully dismantle and remove outdated fixtures like sinks, toilets, and cabinets to make way for new installations. It is important to work with professionals at this stage to avoid harming the infrastructure. In any case, take your time to avoid damaging plumbing or electrical systems that will be reused. Here is an easy 7-step guide you can follow to discard old fixtures safely:
- Turn Off Utilities: Shut off the water supply to the bathroom by closing the main valve or the specific valves for sinks, toilets, and showers, and turn off the electricity to the bathroom at the circuit breaker to prevent electrical accidents.
- Drain and Disconnect Fixtures: Bathroom fixtures are typically integrated into drains and plumbing pipes, so there is bound to be some collected water around them. Flush the toilet tank and bowl to drain any remaining water, and use a sponge or towel to soak up the rest. Then, use a wrench to disconnect the water supply lines for the sink, toilet, and shower.
- Remove the Toilet: Use a wrench to unscrew the bolts securing it to the floor if you are planning on replacing your old toilet. Carefully lift the toilet and place it on a protective sheet. Be gentle with it since toilets are quite heavy and could damage the floor if you aren’t careful. Don’t forget to plug the drain hole with a rag to prevent sewer gases from entering the room.
- Remove the Sink: Sink removal is quite similar to toilet removal, especially if it is mounted on the floor. Start by unscrewing and disconnecting the plumbing connections for the sink, including the water supply lines and drainpipe. Then, remove any mounting brackets or screws securing the sink to the wall, floor, or countertop. Once these are separated, your sink becomes a free agent and can be gently lifted out of its position and set aside.
- Remove the Shower or Bathtub: For shower stalls, begin by removing the showerhead, faucet handles, and other accessories using a wrench or screwdriver. Remove the enclosing panels or tiles around the shower and its base if it has one. For a bathtub, it is enough to disconnect it from the drain and water pipes if it is a standalone tub. However, cut through any caulk or sealant around the edges with a utility knife and carefully pry the tub away from the wall if it is mounted on the wall. In this case, make sure that you don’t damage the surrounding tiles or walls.
- Disconnect and Remove Cabinets and Vanities: Removal of cabinets and vanities depends on their placement and connections. They can be easily taken out of the room if they are not affixed to the walls or the floors. Either way, empty all contents from the cabinets and vanities to prevent any harm to them. You can use a screwdriver to remove the screws or nails securing it to the wall if the fixture is affixed. Then, carefully lift and remove the cabinets or vanities from their position. Pay extra attention to the mirrored section and separate it from the rest of the body if possible to minimize the risk of breaking.
- Clean Up: Clean up the room to prep it for the installation of new fixtures. Remove any remaining debris, nails, or screws from the work area, use a vacuum to clean up dust and small particles, and ensure all pipes and electrical wires are safely tucked away and sealed if necessary.
Use Proper Disposal Methods
Dispose of old materials responsibly by recycling where possible and following local waste disposal regulations. There could be a limit to the amount you can dispose of free of charge, so you might need to contact a private company. Recycling and donations are your best bet to dispose of old fixtures responsibly. Look into local charities or contact big ones like Habitat for Humanity to donate them if your fixtures are in usable condition. Give them to recycling centers and have them repurpose the materials if they cannot be reused or upcycled.
4. Plumbing
Proper plumbing assessment, rerouting if necessary, and the installation of new fixtures are pivotal steps that ensure both functionality and aesthetics align with your design goals.
Assess Existing Plumbing
Begin by evaluating the current plumbing layout to determine its condition and compatibility with your remodeling plans. Plan the layout of your new bathroom in accordance with the plumbing structure to minimize infrastructural adjustments and leverage the existing system to cut back on costs.
Even if rerouting is not necessary, there might be areas that need improvement. Plumbing pipes are prone to limescale buildup and mildew. Replace the pipes if they are worn out and vulnerable to leaking. Similarly, faucets and drains that are extensions of the plumbing network could require updating, especially at the connection points.
Evaluate Rerouting Pipes
Reroute the pipes if the current network is not compatible with the layout you plan. Professionals should carry out such massive infrastructural changes. You can follow these 7 steps to adjust your pipes safely:
- Plan and Design: Before beginning any work, create a detailed blueprint of where you want to reroute the pipes. Consider the new layout of fixtures such as sinks, toilets, and showers. Ensure that the new routing complies with local building codes and regulations. Usually, default layouts place all fixtures and plumbing in one wall to save on expenses and minimize labor. You can utilize the same trick if you are on a tight budget.
- Inspect and Approve: Once the rerouting plan is complete, schedule a consultation with a licensed plumber or building inspector to ensure the work meets local building codes and regulations. Do not proceed without making sure of this point since any mistakes on this front could lead to legal fines and functional problems.
- Turn Off the Water Supply: Shut off the water supply to the bathroom.
- Prepare the Work Area: Uncover the pipes by removing the relevant wall portions. Once exposed, clear the area around the pipes you plan to reroute by removing any fixtures, cabinets, etc., to create a comfortable workspace.
- Mark and Cut Pipes: Use a marker to clearly mark where you intend to cut which of the existing pipes. Precise measuring and labeling will dissipate any confusion and streamline the process. Use a pipe cutter or a hacksaw to carefully cut the pipes at the marked locations. Ensure that the cuts are clean and straight.
- Remove Old Pipes: Remove the sections of the old pipes that you have cut. Use appropriate tools to disconnect them if you encounter any fittings or connections. Be cautious to avoid damaging surrounding pipes or fixtures that you intend to keep or repurpose.
- Install New Pipes: Measure and cut new sections of pipes to fit the new routing plan. Securely join the new pipes with appropriate fittings and connectors.
- Test for Leaks: Once all connections are made, turn the water supply back on and thoroughly check for leaks before covering up the pipes again. At this stage, inspect each joint and connection point carefully since even tiny leaks could grow over time if a single pipe is too loosely attached.
- Patch and Repair: After confirming there are no leaks, patch up any holes or gaps created during the rerouting process. This may involve replacing drywall, retiling, or applying a new layer of flooring as needed.
Install New Plumbing Fixtures
There are four main plumbing fixtures you will need to install: sinks, showers, toilets, and tubs. Here are brief guides on how to install them to give you a glimpse of the process.
Sinks:
- Site Prep: Clear the space where the sink will be installed.
- Install Drain and Water Lines: Connect the sink drain to the existing plumbing and attach water supply lines to the faucet. Once the previous sink is removed, these connections will be clearly exposed.
- Secure the Sink: Place the sink into position and secure it to the wall, floor, or vanity.
- Seal and Test: Apply silicone sealant around the edges of the sink. Turn on the water supply and check for leaks.
Showers:
- Prepare Shower Area: Remove old fixtures and clean the shower area thoroughly.
- Install Shower Valve: Follow the manufacturer’s instructions to install the shower valve, ensuring proper placement and connection to water supply lines.
- Mount Showerhead and Controls: Attach the showerhead and controls to the wall or ceiling, ensuring they are securely fastened.
- Seal and Test: Apply sealant around fixtures. Turn on the water to check for leaks and ensure proper water flow and temperature control.
Toilets:
- Turn Off Water: Shut off the water supply to the toilet.
- Remove Old Toilet: Disconnect and remove the old toilet. Clean the flange and inspect for damage.
- Install Wax Ring: Place a new wax ring on the flange to seal the toilet base.
- Install Toilet: Set the new toilet in place, aligning it with the flange bolts. Press down to secure it and tighten the bolts.
- Connect Water Supply: Attach the water supply line to the toilet tank. Turn on the water and check for leaks around the base and connections.
Hire a Professional
Consider hiring a professional plumber if you lack the experience to undertake such complicated tasks. For example, rerouting or handling extremely old pipes is meant to be done by experts. Assess your situation carefully, and do not try to DIY it if you aren’t confident in your abilities in this specific context.
5. Enhancing Electric System
Enhancing the electric system of your bathroom is completely about functionality. Infrastructural changes have no aesthetic implications, so they should be handled with maximum attention to safety and efficiency. Carefully plan the electrical layout necessary for the intended bathroom design and assess the current quality of the wiring to see if it needs to be upgraded. Many appliances, such as lighting and fans, are powered by electricity, and hiring a professional to handle infrastructural enhancements and install new fixtures would be the safest way to success.
Plan Electrical Layout
Begin by designing a detailed electrical layout to accommodate new fixtures and outlets while adhering to safety codes. Be clear about the placement of new lighting fixtures, switches, outlets, and similar electrically powered household items to create this layout. For instance, if you intend to incorporate task lighting into your vanity, you will need to protect the wiring from water splashes and upgrade the protection around the cables.
Upgrade Wiring
Your bathroom wiring might need an upgrade if it is outdated or if the new fixtures you are incorporating into your space exceed the current capacity. Upgrading the wiring enhances the efficiency and safety of your electrical system.
Install New Lighting and Fans
Installing new lighting and fans in a bathroom remodel can be achieved through these 5 steps:
- Turn off power: Before starting any electrical work, turn off the power in the bathroom on the breaker panel. This will prevent electrocution.
- Install junction boxes: Junction boxes are a great way to protect the delicate joining points of various cables. Mount junction boxes for each fixture, ensuring they are securely fastened to support the weight. Opt for a waterproof model to have an extra layer of protection.
- Connect wiring: Follow manufacturer instructions to connect wires from the fixture to the electrical system, ensuring all connections are secure.
- Secure fixtures: Install the fixtures according to the provided instructions, ensuring they are level and firmly attached.
- Test functionality: Once installed, restore power and test each fixture to ensure proper operation.
Hire a Professional
Hiring a licensed electrician will ensure that all electrical work conducted at your home meets safety standards and local building codes. Professionals have the expertise to handle complex installations and ensure the electrical system is safe and reliable. A misguided adjustment of the electric system could lead to fines and massive safety hazards.
6. Installation of New Fixtures
Upgrading your bathroom with new fixtures enhances both its aesthetics and functionality. Whether you’re installing vanities, sinks, showers, tubs, or toilets, each element plays a critical role in the overall design and usability of the space.
Install Vanities and Sinks
Installing vanities and sinks go hand in hand. Choose a vanity that meets your aesthetic and functional needs and offers ample storage space. The sink should be compatible with the vanity. Combined, the vanity-sink pair could be used as a focal point to solidify the aesthetic vision for the space.
Measuring available space, locating wall studs, planning for electric outlets and plumbing, positioning, and securing the vanity are basic considerations for installation. Our step-by-step bathroom vanity installation guide provides more detailed installation information.
Install Shower and Tub
Shower stalls are multi-component fixtures, while tubs are essentially simpler. Shower stalls need flooring and wall panels, while tubs require neither. Yet, due to their size and importance, they both need to be integrated into the plumbing network and installed carefully.
- Prepare the Area: Clear the installation space and ensure plumbing rough-ins are correctly positioned. If the tub is too heavy, you might need to reinforce the floor. Install a separate floorboard for a shower stall if you aren’t going for a wet, open bathroom layout.
- Position the Fixture: Carefully place the shower or tub in the designated area, ensuring alignment with the drain and water lines. Make sure the ground is level before installing either.
- Secure and Connect: Attach the fixture to the studs or floor, secure with brackets or feet, and connect the drain and water supply lines. Tubs, depending on their size and material, could be particularly heavy. Make sure the feet of the tub or the floor it is affixed to are strong enough to support its weight.
- Seal and Test: Apply silicone caulking around the edges, turn on the water supply, and check for leaks.
Toilet Installation
- Turn Off Water: Shut off the water supply to the toilet to safely carry out the installation process.
- Install Wax Ring: Place a new wax ring on the flange.
- Position the Toilet: Set the new toilet in place, aligning it with flange bolts.
- Secure and Connect: Tighten bolts, attach the water supply line, and turn on the water. Once all of these are done, there should be no leaks or other issues.
Place Fixtures
The placement of fixtures should be strategic to maximize efficiency and aesthetic appeal in your space. There is no one right way to do this since placement and overall layout are inevitably dependent on the size, shape, and purpose of your bathroom. You can keep these 5 tips in mind prior to your layout choice to see if you can hit two birds with one stone:
- Vanities: Position vanities for easy access, ensuring there is enough space to open drawers and doors without obstruction. Ideally, they should be placed near the plumbing and centrally to create a focus point.
- Showers and Tubs: Place showers and tubs in areas that maximize space usage. These two fixtures are potentially the largest ones you will need to situate. Corner installations can save space, while standalone tubs can serve as focal points.
- Toilets: Place toilets in a way that ensures privacy and convenience. In an L-shaped room, they can be in the corner behind the separating door. Toilets don’t have much aesthetic appeal, and due to their build, they can’t reflect the intended style. So, in any case, they should be easily accessible but not the first thing seen when entering the bathroom.
- Lighting and Electrical Outlets: Ensure lighting is strategically placed for optimal illumination, particularly around mirrors and vanities. You can layer ambient lighting with task lighting to create a warm, luxurious space. Placement of outlets is tricky due to a bathroom’s wet nature. You should plan for electrical outlets near vanities for convenience, but you should adhere to safety standards to prevent electrocution.
- Storage and Accessories: Position storage units, towel racks, and other accessories within easy reach but out of the way of primary pathways. Since they are the bulkiest appliance in the room, they could easily obstruct your path and make your bathroom experience hell. This placement helps maintain a clean and organized appearance.
7. Finishing Touches
Finishing touches in a bathroom remodeling project tie the whole picture together and completely flesh out your vision. Installing tiles and flooring or improving wall treatments covers up most of the mess left over from infrastructural adjustments or the installation of new fixtures and opens up a clean slate in your bathroom. At this stage, you can choose some additional accessories and hardware to truly make the space your own and impress your vision on it.
Install Tile and Flooring
Tiles and flooring are installed almost last to prevent the heavy foot traffic and dust fall of the remodeling project from harming them before their lifecycle properly begins. Here is a 6-step guide to how you can install tile and flooring in a bathroom remodel:
- Prepare the Subfloor: Ensure the subfloor is clean, dry, and level. It should be foundationally strong enough to support the weight of all those appliances.
- Plan Layout: Measure the area and plan the tile layout. Patterned tiles need extra care. Labeling them and deciding which one goes where before the installation will minimize setbacks. You can dry-lay tiles first to determine the best fit and pattern.
- Apply Adhesive: Spread tile adhesive using a notched trowel. Work in small sections to prevent the adhesive from drying out and becoming useless.
- Lay Tiles: Place the tiles carefully, using spacers for even gaps. Once the tiles are in place, press them firmly into the adhesive. Be careful not to break the tiles while pressing them in.
- Grout Tiles: Once the adhesive is set, apply grout with a rubber float. Fill gaps and remove excess grout with a damp sponge.
- Seal Tiles: Apply a sealer to protect the tiles and grout from moisture and stains.
Renew Painting and Wall Treatments
You can revitalize the space and highlight the upgrades by renewing the painting and wall treatments of your bathroom. Here are 3 types of wall treatments and tips on how to achieve a tangible effect through them:
- Painting: You can choose any color or texture to accentuate your walls. If you want a rough, textured surface, you can leave the walls as they are and paint them with prominent brush strokes. If you want a smooth surface, you can clean and sand the walls prior to the painting and use roller brushes for an evenly distributed painting. Also, you should choose moisture-resistant paint suited for bathroom use to ensure its longevity.
- Wallpaper: Wallpaper offers more variety in terms of color, texture, and patterns. It is available in moisture- and mold-resistant options. Before you install wallpaper, you should clean the walls and fill any gaps or remove any imperfections that could impact its appearance. Then, you can easily apply the wallpaper. Make sure to use a smoothing tool to prevent air bubbles.
- Tile Wainscoting: Wainscoting has become quite popular in recent years. By adding a decorative and protective tile halfway up the wall, you can create visual interest and prevent moisture collection on bare walls.
Choose The Right Hardware and Accessories
Selecting complementary hardware and accessories such as towel bars, hooks, and mirrors ensures that the desired aesthetic runs cohesively through the space at every detail. Since these are minor details, change them up as you go and replace them if they don’t work out for you.
Make Final Adjustments
Once all the steps are done, it is time for final adjustments. Go through your largely remodeled bathroom and see if anything is lacking. Going through the routine motions as if they are being used once or twice could give you valuable insight into what is working and what is not. Final adjustments are not drastic. They include things like adjusting the height of the towel bar, the intensity of the chosen lights, or the placement of accessories. These optimizations could take a little time to ensure everything is perfect.
8. Final Inspection and Cleanup
Final inspection and cleanup at the end of a bathroom remodel aim to confirm the correct completion of the project for the client and the contractor and to prep the space for daily use. Creating an inspection checklist or getting professional inspectors will ensure everything is up to code and to your standards. The disposal of excess waste and a thorough clean-up will officially declare that your bathroom is ready to open its doors for you.
Create an Inspection Checklist
The following inspection checklist helps you determine whether your bathroom remodel meets standards. You can add more points concerning your aesthetic expectations and whether they were met.
- Overall Appearance: Assess the overall look and feel of the bathroom.
- Cleanliness: Check for cleanliness, including dust, debris, and smudges on surfaces.
- Odors: Ensure there are no lingering construction odors.
- Wall Finishes: Inspect walls for smoothness, paint or tile finish quality, and uniformity.
- Flooring: Check flooring for levelness, cleanliness, and any damage.
- Sinks and Faucets: Test faucets for proper operation and check for leaks.
- Toilets: Ensure toilets flush correctly and are securely installed.
- Shower or Bathtub: Test water flow and drainage and ensure caulking is neat and effective.
- Towel Bars and Hooks: Verify placement and ensure they are securely attached.
- Mirrors: Check for clarity, positioning, and secure mounting.
- Cabinets: Open and close cabinets to check hinges and drawers for smooth operation.
- Storage Space: Evaluate functionality and accessibility of shelves and storage solutions.
- Light Fixtures: Turn on all lights to ensure they work and provide adequate illumination.
- Outlets and Switches: Test all outlets and switches for functionality.
- Exhaust Fan: Test fan operation for adequate ventilation.
- Grout and Caulking: Inspect grout lines and caulking for completeness and cleanliness.
- Grab Bars (if applicable): Ensure they are securely mounted and meet safety standards.
- Slip Resistance: Check flooring and bath/shower surfaces for slip resistance.
- Water Temperature: Test hot and cold water settings.
- Storage Accessibility: Ensure all storage areas are easy to access and use.
- Client Walk-Through: Walk through the bathroom with the contractor to discuss any concerns or final adjustments.
Get a Professional Inspection
A professional inspection tells you if everything meets local codes and regulations and whether there are concealed issues behind seemingly perfect appliances while you assess surface-level components. Professionals have better tools to quantitatively measure and certify the state of equipment, such as leak detectors to see if the pipes are leaking or levels to see if the tub is placed levelly on the floor.
Clean Up
Cleaning up the debris, dust, and discarded appliances and equipment from your bathroom space will make it ready for use. Make sure to clean all surfaces with the appropriate cleaning supplies to get rid of all the construction mess.
Dispose of The Waste Properly
To properly dispose of the waste from a bathroom remodel, you should consider recycling and repurposing. If your equipment is not in bad condition, you can pass it along to local charities or directly to those in need. Due to the sheer size of certain items, such as a tub, you might need to hire a driver to help with removing big appliances.
Conclusion
In conclusion, a bathroom remodel is a great opportunity to create a space that is both functional and beautiful. Carefully plan your project and choose the right contractor to ensure a smooth and successful renovation. With a little effort, turn your bathroom into a spa-like retreat that you will enjoy for years to come.